Install Hyper-V backup plugins
Download Backup Plugin
The Hyper-V VM backup plugins can be downloaded from the login screen of Vinchin backup server's web console.
- By clicking on Download Backup Plugin, you'll see the download options.
- In Type dropdown list, select VM Backup Plugin option.
- In Platform dropdown list, select Microsoft Hyper-V.
- Click on Download button to download the installer.
Install on Windows Server with Desktop Experience
The VM backup plugin for Hyper-V should be installed on all the Hyper-V hosts (Standalone, Failover Cluster and SCVMM), please upload the backup plugin installer to all the hosts for installation.
- Right click the installer and run the installer with administrator privileges (In SCVMM environment, please use SCVMM domain user to install the backup plugin on both Hyper-V host and SCVMM server).
When you see the installation wizard, click on Quick Install to begin the installation process.
In case of a Failover Cluster environment, you also need to modify the backup plugin service’s login permission as a domain user with local administrator privileges, and then restart the backup plugin services. To do this, please continue the following steps.
Right click the Start icon, select Run, type services.msc in the Run box and press Enter to open the Windows Services Manager.
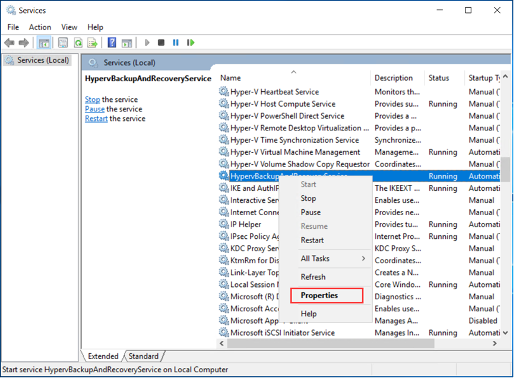
- Find the HypervBackupAndRecoveryService in the Services manager, right click on this service and select Properties.
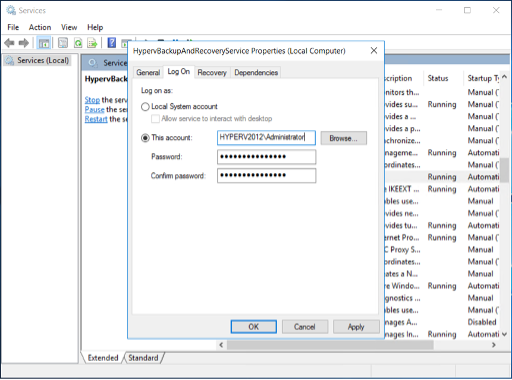
- In the property settings dialog, select Log On and set a domain user with local administrator privileges as the below example.
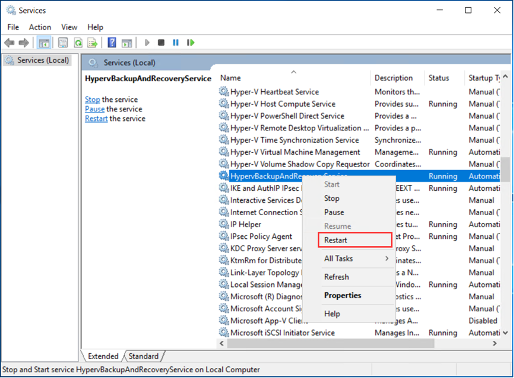
- When done, apply the changes and restart the service.
Install on Windows Server Core in Silent Mode
If you are running Hyper-V natively on host hardware or within the Windows Server Core, you can install the backup plugin in silent mode. To copy the installer to the Hyper-V host or Windows Server, you can use a USB flash drive to copy the installer to the Hyper-V host or Windows Server Core. Or you can share the installer from your Windows PC, then from the Hyper-V host or Windows Server Core command lines to copy the installer. To copy the shared installer, please first use the below command to establish a connection to the Windows PC.
net use \\ip_of_windows_pc\ipc$ pass /user:username
'ip_of_windows_pc' should be the exact IP address of the Windows PC which shares the installer. 'pass' should be the password of the Windows PC user. 'username' should be the username sharing the installer on the Windows PC. Then use below command to copy the backup plugin installer to the Hyper-V host or Windows Server Core.
copy \\ip_of_windows_pc\folder\file_name1 \path\file_name2
'ip_of_windows_pc' should be the exact IP address of the Windows PC which shares the installer. 'folder_name1' should be the exact backup plugin installer file name. 'path' should be the full path on Hyper-V host or Windows Server Core where you want to save the installer. 'file_name2' can be a new file name or you can type the original file name to be saved on the Hyper-V host or Windows Server Core. To install the backup plugin, please go to the directory where you copied the installer, then use the below command to install.
vinchin-hyper-v-agent.windows.7.2.0.xxx.exe /verysilent
Where 'xxx' should be the exact version number of the downloaded backup plugin installer. After installation, please check the backup plugin service connection status using below command.
netstat -a
If you got active TCP connection on port 29200 and 29201 as shown below, then the backup plugin is successfully installed and services are up running.
TCP 0.0.0.0:29200 WIN-L2MSB093K5D:0 LISTENING
TCP 0.0.0.0:29201 WIN-L2MSB093K5D:0 LISTENING