Install Vinchin Server as oVirt VM
System Requirements
To install Vinchin server as a virtual machine on oVirt, the recommended system configurations of the VM are as below.
| Hardware | Requirements |
|---|---|
| CPU | 16*vCPUs or more |
| RAM | 16GB or more |
| Guest OS | Rocky Linux |
| Virtual Disk | 200GB or more (for OS installation only) |
| Backup Storage | 1.5 times (or more) capacity of the production data size. |
Notice
Since you are going to install Vinchin backup server as a virtual machine on the virtual platform, please do not use virtual disk as backup storage, otherwise there’s possibility of losing both your production data and backup data. You could choose to use external NAS server or other storage servers to provide iSCSI or NFS/CIFS shares to Vinchin backup server VM as backup storage.
Download ISO Image
Go to Vinchin product trial page using the URL below:
https://www.vinchin.com/vm-backup-free-trial.html
Simply register for your free trial with your full name, email address and your hypervisor type. Then the latest ISO image will be downloaded automatically, at the same time you’ll receive an email with a 60-day free trial license attached.
Please keep the free trial license safe, as after installation you’ll need it to activate Vinchin backup server for 60 days of free trial.
Create Vinchin Server VM
To install Vinchin backup server as an oVirt VM, please follow the steps below.
- Open the oVirt management web console and go to Compute > Virtual Machines page.
- Click on New to create a new VM.
In the New Virtual Machine dialog, configure the General settings of the new VM.
Cluster: select a cluster in which you wish Vinchin backup server VM to run.
Operating System: select Linux as the guest operating system.
Name: give a name to the new VM for identification.
Instance Images: click on Create button to create a new virtual disk. In the New Virtual Disk dialog, please give the new virtual disk at least 100GB space for Vinchin backup server to be able to install and function well. And make sure the disk is set as Bootable, for other fields, you can accept the default settings, or change them if required. Once done, click on OK.
Connect the Vinchin backup server VM to the network. Add a network interface by selecting a vNIC profile from the nic1 drop-down list at the bottom of the General tab.
Specify the Memory Size and Total Virtual CPUs for Vinchin backup server VM on the System tab. For more information of the recommended memory size and CPU number, please refer to System Requirements.
On the Boot Options tab, under Boot Sequence, please set CD-ROM as First Device and set Hard Disk as Second Device, and please select Attach CD, then select Vinchin backup server ISO from your oVirt ISO store (Vinchin backup server ISO file needs to be uploaded to the ISO store first).
You can accept the default settings for all other fields, or change them if required. Click on OK to create Vinchin backup server VM.
Once the Vinchin backup server VM is created, select it from the Compute > Virtual Machines screen and click on Run.
Click on Console to open Vinchin backup server VM with Remote Viewer, and you can begin with the installation process.
Installation Process
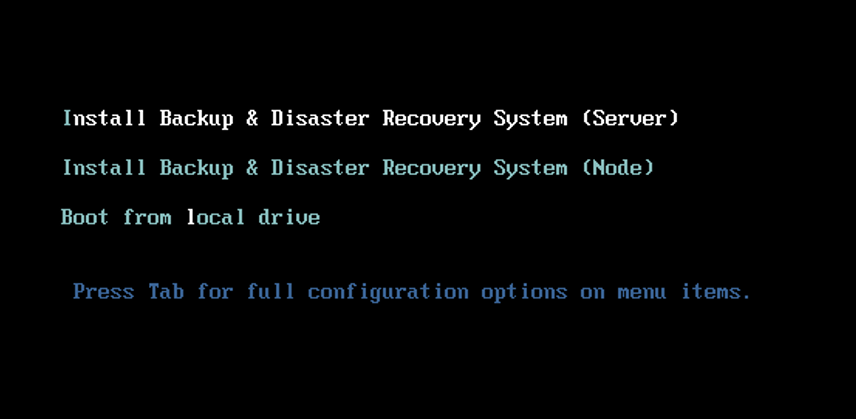
Step 1: Start installation process
By selecting Install Backup & Disaster Recovery System (Server) and press Enter to start the installation process.
Step 2: Select time zone
On the INSTALLATION SUMMARY screen, by selecting Time & Date to configure system time zone.
Select the time zone where you are located in, then click Done to continue to the next step.
Step 3: Select installation destination
By selecting Installation Destination to configure on which disk the system will be installed.
Please only select the disk for operating system installation, the data disk (if any) should be left unselected.
Then select Done to continue.
Step 4: Configure network settings
By selecting Network & Host Name to configure network settings of the backup server.
Select the network interface which you wish to setup its network profile then select Configure....
Select IPv4 Settings, then in the Method dropdown list select Manual.
Select Add to add an IP address for the network interface, a valid netmask and gateway should also be specified. Please make sure that the IP you assigned to the server is reachable to the virtual platform and other workloads which you wish to backup.
In the DNS Servers field, input a valid DNS server IP then select Save.
Once the network settings had been configured, switch the network interface from OFF to ON to enable the network interface to auto start up with the server. And in the Host Name field, you can optionally specify a host name for the server and click on Apply.
Once turned the network interface on and configured host name, please select Done to continue.
Step 5: Begin installation
Select Begin Installation to confirm the server installation.
Please wait a while for the installation process to be completed. During the installation process, you DO NOT have to configure CLI user password or create any new user.
When the installation process is completed, you will be requested to reboot the server.
Select Reboot to complete the installation process.
Notice
Vinchin software packages will be installed during the first reboot, please wait patiently for the first reboot to be completed and DO NOT power off or restart the server, otherwise installation of the Vinchin software will fail!
Change CLI user password
After installation, the backup server needs to be restarted. When you see the command line login prompt. Please log in the command line interface using the below default credentials:
Username: backup
Password: Backup@3R
For the security precautions of the backup server, please change the CLI user password at first login by using the below command.
passwd
After changing the CLI user password, please keep it safe and do not loss it.