Oracle Database Restore
Before Restoring Oracle Database
Before starting to restore Oracle database, there are some configurations need DBA to check.
Target recovery database server needs database backup agent installed, and if it’s Linux system, the service ports: 20200, 20300 and 20400 needs to be opened to Vinchin backup server.
Target Oracle database instance needs to be shutdown, and static listener registration needs to be configured in listener.ora file.
Archivelog mode needs to be enabled with the target Oracle database server. You can check status by login to sqlplus and using below command.
archivelog list;
Check if Automatic archival status is Enabled, if not please configure this by DBA.
Check whether the database instance can be connected by using below command. In standalone environment.
rman target=username/password@instancename
In RAC cluster, use below command.
rman target=username/password@publicIP:1521/instancename
If connection fails, the restore job will fail, please contact DBA to fix it.
If using Override Original Database mode, there’re some prerequisites that need to be done and checked. Please carefully read the following points to avoid any errors:
1. The target Oracle database instance needs to be shutdown.
2. Static listener registration for the target database instance needs to be configured.
3. Archivelog mode needs to be enabled with the target Oracle database server.
4. When Override Original Database restores to another Oracle database server, the target server should have the same configurations as the source server, including operating system version, database version, database installation path, database instance name, database username and password.
5. When restoring to another Oracle database server, the archive logs and redo logs need to be deleted on the target server.
If Override Original Database restore to another database server, it requires the target database server configurations should be the same as the source database server, including operating system, database version, installation path and instance name. Please be careful to use override original database function.
If Restore to New Path, the database path will be automatically changed to the new path specified during the restore process. After restoration, DBA can just start the database services directly from the new path.
If Restore Exported Directory, it quires to be manually restored from the exported directory after some configuration in Oracle instance. Detailed operation can refer to How to Restore Exported Directory section.
Notice
Restore to New Path does not work with Oracle RAC, because the database path will only change on the RAC node which the restore job is associated to, other nodes will not be changed. If you use Restore to New Path with Oracle RAC, it will cause Oracle RAC exception!
Create Oracle Restore Job
To restore databases from database backup restore points, please go to Physical Backup > Database Backup > Restore page. There are 4 steps to restore databases from the database backup restore points.
Step 1. Restore Point
In the Restore Point dropdown list, select a backup node which stores the desired restore points. Select a target database restore point under your database which you want to restore. You can quickly find the target restore point by searching the job name, database name or the date of the restore point. One restore job only can select one restore point.
Step 2. Restore Destination
After selecting restore point, select Target Instance which you wish to restore.
Step 3. Restore Strategy
Mode: Override Original Database, Restore to New Path, Restore Exported Directory
Override Original Database applies to restore the data to the production database server. Override the data of the original database instance.
Restore to New Path applies to restore data to a new directory. The directory needs to be created by the Oracle database installation user, do not use a directory which does not exist.
Restore Exported Directory applies to manually restore the data, and alter the instance to the original one in the backup data.
Rollback Time: if you had selected archive log backup restore point, you are able to rollback Oracle database state within the given time range.
If you disable rollback time it will by default restore to the latest time point of when the backup has been taken.
Multithread: backup data will be transferred over multiple channels to improve the restore speed. The default value is 1, and the maximum value is 6.
Throttling Policy: Same as database backup, while restoring databases, you can also configure throttling policy to limit the database restore speed accordingly.
Step 4. Review & Confirm
After completing the above-mentioned settings, you are able to review and confirm the settings in one screen.
Once the job has been created, you’ll be redirected to the Monitor Center > Jobs page.
As the database restore job is by default to be executed right after the creation of the job, so it will run automatically, when you see it in the current job list, it should be in running status already, and once completed, the job will be automatically deleted from the current job list.
After this you can browse the restored job from History Jobs. Your restored data will be found in the path you select.
Restore Exported Directory
Restore Configuration file 'pfile'
If you need to modify the configuration file, please first modify the 'pfile' file in the exported directory before proceeding with the recovery. The exported directory configured for this recovery task is '/u01/data'.
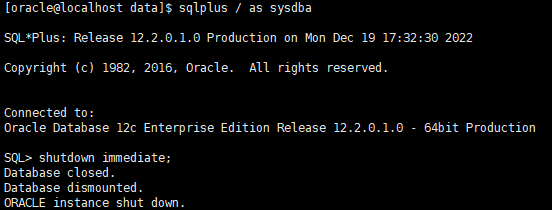
Use 'sqlplus' to access and shutdown the database:
sqlplus / as sysdba
shutdown immediate;
create spfile from pfile='/u01/data/pfile.file';

Restore Control file 'controlfile'
Use 'sqlplus' to set the database to 'nomount' status:
startup nomount;
quit
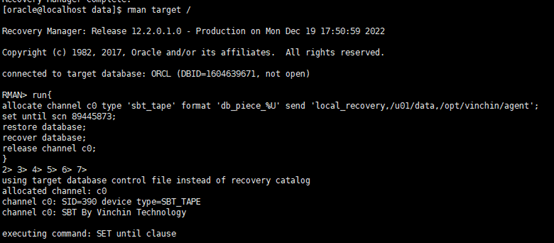
rman target /S

Note whether this instance is the instance you want to restore. If not, please specify the target instance name to connect.
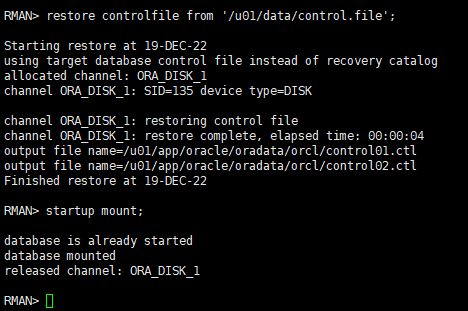
restore controlfile from '/u01/data/control.file';
Then set the database to ‘mount’ status.
startup mount;
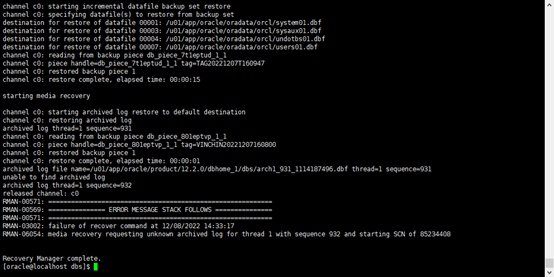
Restore the data
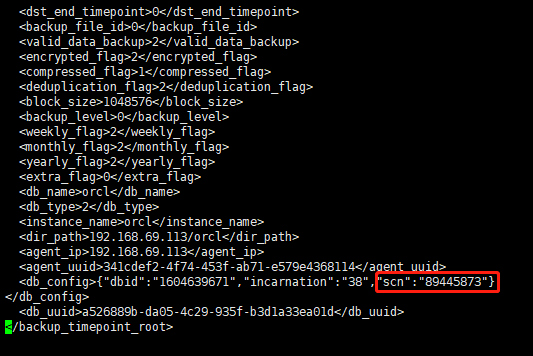
Check the 'seledescription.xml' in the exported file, get the scn number '89445873'.
Quit the 'rman' command and re-access 'rman' command. Check whether the DBID is same with the DBID in self-description file. If not same, need to shutdown the database and set it to 'nomount' status, then execute 'set DBID 89445873;' command to setup it.
reset database to incarnation 38;
Then execute the following command:
run{
allocate channel c0 type 'sbt_tape' format 'db_piece_%U' send 'local_recovery,/u01/data,/opt/vinchin/agent';
set until scn 89445873;
restore database;
recover database;
release channel c0;
}
The command explained as follows:
allocate channel c0 type 'sbt_tape' format 'db_piece_%U' send 'local_recovery,/u01/data,/opt/vinchin/agent';
'u01/data' is the exported directory;
'opt/vinchin/agent' is the installation directory of the Vinchin agent;
'set until scn 89445873;' is used for setup the scn number same with the scn in self-description file.
Notice
If there is an error as 'rman06054', do not need to deal with it. Just startup the database directly.
Use 'sqlplus' to startup the database
quit
sqlplus / as sysdba
alter database open resetlogs;
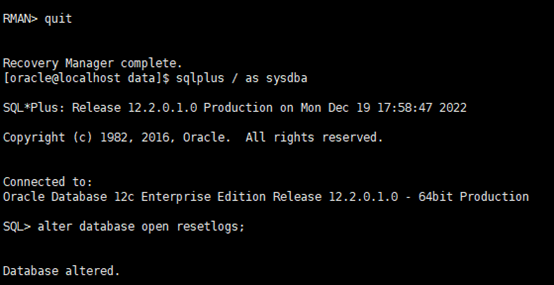
Now the recovery has finished and can use the original database in the exported files.