Backup Exchange Objects
To create an Exchange backup job, you can get started from the Backup > Microsoft 365 page.
The New M365 Backup Job wizard for Exchange opens. Please complete the wizard follow the below steps.
Step 1. Select Exchange to Backup
Select Exchange to be backed up from the select a backup source column. The selected backup object(s) will be listed in the Selected backup source column.
By default, all Exchange Directories will be backed up, if you wish to exclude certain Directories from backing up, please click Exclude button, in the displayed dialog box on the right, select the Directories that you do not want to back up.
Notice
You can only add Exchange objects from the same Exchange Organization, if you have multiple Exchange Organizations, please create new jobs for the other Organizations separately.
Step 2. Select Backup Destination
A backup destination (backup storage) should be associated with this backup job.
In the Target Node dropdown list, you can select a backup node on which you want the backup data to be processed and stored.
In the Target Storage dropdown list, the storages which belong to the selected backup node can be selected.
When done selecting the backup storage, please click on Next to continue.
Step 3. Configure Backup Strategies
General Strategy
Under the General Strategy tab, you can setup the backup Time Schedule, Throttling Policy, Data Storage Policy, Retention Policy and some other advanced options.
In the Select Strategy dropdown list, you can select a preconfigured strategy template, if you had created strategy templates, otherwise choose Customize Strategy. For how to create strategy templates, please refer to Strategy Templates.
To determine the backup window of this job, the Time Windows indicator can be a reference for you to determine in which time window the job should be scheduled.
In the Mode dropdown list, you can choose to setup a Backup as Scheduled job or a Once-off Backup job.
For a once-off backup job, the job will only run for once, and only full backup will be performed. You only have to appoint a time of when to start the backup job in the Start Time field.
For a scheduled backup job, you can schedule full backup only, full with incremental combination, and forever incremental backup methods. The recommended backup strategy is full with incremental combination.
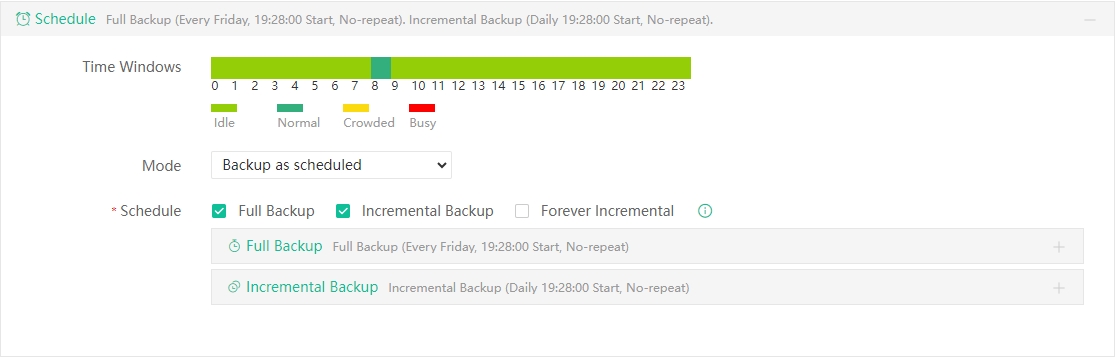
Vinchin backup server will suggest a time to start the backup job, please change the start time as per your requirements. When the start time of a full backup is overlapped with an incremental backup, full backup will be taken at first priority, and the incremental backup will be taken on the next scheduled start time.
If you want to customize the schedules according to your requirements, you can click on the + icon to expand and customize the settings for either full backups or incremental backups.
For example, you can schedule full backups twice a month without repeating.
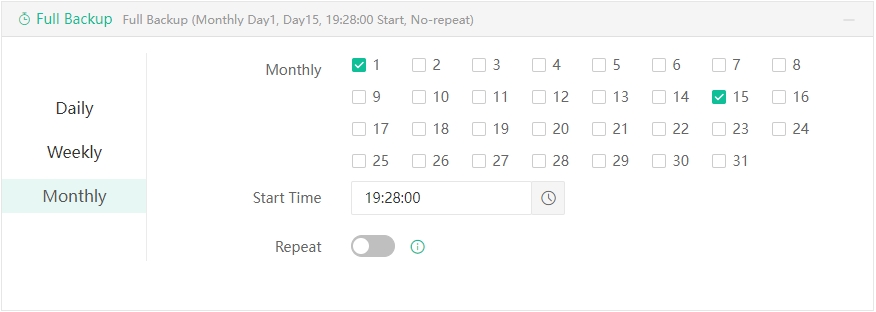
Then configure several incremental backups each day, by default incremental backup will run only for once each day, to run incremental backups several times a day, you can enable the Repeat option.
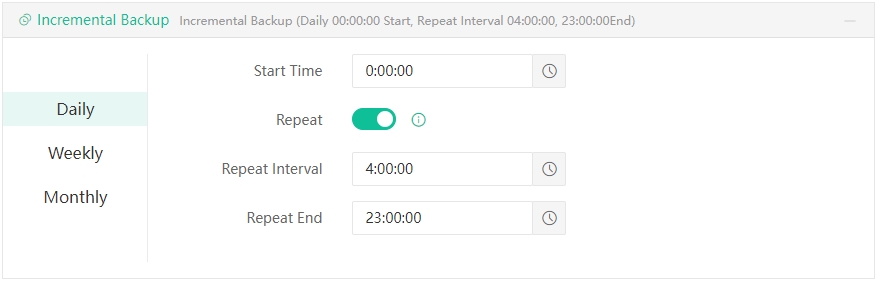
In the above example, full backups will run on day 1 and day 15 of each month, incremental backups will start to run at 0:00 every day and repeat every 4 hours till 23:00 of the day. This is just an example, you should configure the schedules per your requirements based on your actual virtual environments.
After configuring the time schedules of the backups, next you can configure the Throttling policy, the Throttling policy settings are optional, only if the backup jobs will bring network or I/O overload to your production environment, you can configure the throttling policy accordingly otherwise leave it unconfigured.
Data Storage Policy including Deduplication, Compression and Encryption of the backup data.
By enabling Data Deduplication and Data Compression, you can save the bandwidth and storage resources for transmitting and storing the backup data. The Compression Level can be set as Quick Compression, Standard Compression, Maximum Compression and Ultimate Compression. with different level will have different compression efficiency, however, the higher the level, the higher the system load and the slower the backup speed.
By enabling Data Encryption, the backup data will be encrypted and then stored into the backup storage. A password needs to be specified to secure the data encryption, when creating an Exchange restore job, password verification is required to perform Exchange restore.
Retention Policy can be used to define how long the backup data to be reserved in the backup storage, you can either define the retention policy with Number of Restore Points or Number of Days mode.
Transmission Strategy
For Exchange backup, the backup data can be transferred through Encrypted Transfer.
Additionally, by enabling Client Configuration, you can specify a client for the backup job. This allows you to assign different clients within the same organization to perform backups concurrently, enhancing the efficiency of backing up a single organization.
The Transmission Network supports two modes for configuring network connections between devices. Auto match: The server willautomatically match the lP addresses that can communicate. Custom selection: lt is necessary to select the backup node network and ensure that it can be connected to the host.
By specifying the number of Transfer Threads, you can enable multithreaded transmission to improve the processing speed of the backup job. The default value for multithreaded transmission is 3, even if you can set the value from 1 to 16, but usually 3 threads will be enough.
Security Strategy
For WORM Protection, you can only enable this option when selected storage device with the WORM protection feature enabled. Backup points with WORM Protection enabled cannot be modified or deleted and their retention period can only be extended until they expire. The default protection period is 7 days, and the support range is 1 to 9999 days.
For Integrity Check, before performing incremental/differential backups, perform integrity verification on the dependent points of this backup. Incremental backups verify the dependent full/incremental backup points, while differential backups verify the dependent full backup points. Check Schedule: Supports setting integrity check once a week, once a day, and every backup. When Full Backup Point Anomaly, you can choose Redo full backup or Terminate backup. When Incremental Backup Point Anomaly, you can choose Redo the full backup, Redo incremental or Terminate backup.
Advanced Strategy
Advanced Strategy contains some advanced options for the M365 backup job. It has Retry strategy and Overload Protection two tabs.
In Retry stratrgy module, the default Network Retry Attempts is 10, it means that system will perform 10 Network retry attempts before giving up. You can set up to 60 attempts. The Network Retry Interval between each retry attempts is 5-60 seconds.
The Operation Exception Retry can be enabled, if an operation excepetion occurs during job execution, it will re-execute according to the configured retry strategy. The number of operation exception retry attempts can be set from 1-5. And the operation retry interval can be set from 5-60 seconds.
The Job Retry function can be enabled, After enabling job retry, if an objects exception occurs during job execution, it will re-execute according to the configured retry strategy. You can choose retry only failed objects or retry all objects. The job retry attempts can be set from 1 to 5, and the job retry interval between each retry attempts can be set from 1-60 minutes.
In Overload Protection module, you can enable Ignore Node Resource Limits option. Ignore the resource limitations of nodes especially for some high priority backup jobs.
Step 4. Review and Confirm Job Settings
After completing the above-mentioned settings, you can review and confirm the settings in one screen.
A job name can be specified for identification of the Exchange backup jobs, and by clicking on the Submit button to confirm the settings and create the backup job.
After creating a new backup job, you can find it on the Monitor Center > Jobs page, under the Current Job tab.